Who Searches “Product Photo to Model Photo” — and Why
Sellers search this when they have garment photos — flat lays, hanger shots,
mannequin images — but no on-model versions.
The gap matters because shoppers respond differently to clothes shown on a person versus clothes shown on a table or a rack.
The people who search this keyword are usually:
- Small fashion brands and Shopify or Etsy store owners who shoot their own products but can’t afford regular model sessions
- Online wholesalers who receive product images from suppliers and need to show them worn before resale
- E-commerce operators managing large SKU catalogs who need more coverage than a single photoshoot day can produce
The search intent is practical: “I already have a product photo.
What are my options to show it on a model,
and which one fits my budget and timeline?”
This guide covers five methods in that order —
from the highest-effort option to the fastest.
Five Methods Practitioners Compare
1. Studio Photoshoot
You book a studio, hire a model, and work with a photographer.
After the session, you wait for editing and final delivery.
What it costs: Studio rental, model fees, photographer fees, editing.
All three add up separately.
Turnaround: Usually one to two weeks from shoot day to delivered files.
Quality: The highest available.
Real clothes on a real person, with full control over lighting, styling, and poses.
Scalability: Limited by scheduling.
Each new SKU or seasonal refresh means re-booking everything.
This option makes sense when you need hero images for a campaign or a flagship product, and you have the lead time.
It becomes a bottleneck when you have dozens of SKUs or need images quickly.
2. Freelance Composite (Outsourced Photoshop)
You find a retoucher on a platform like Fiverr or Upwork and send them your flat lay or hanger shot.
They cut out the garment and place it onto a stock model image.
What it costs: Per-image fees that vary widely depending on the freelancer’s experience and location.
Turnaround: A few days for a small batch; longer for revisions.
Quality: Inconsistent.
A skilled retoucher can produce convincing results.
A less experienced one may leave edges that look cut-and-pasted.
Scalability: You can send multiple images at once,
but communication overhead grows as volume increases.
The main risk here is quality variance.
If you’re running a batch of twenty items, results will not all look the same.
Reviewing and requesting revisions for each one takes time.
3. DIY (Photoshop or Canva)
You do the composite work yourself: remove the background, find a stock model image,
and combine them.
What it costs: Software subscription (or free tools like Canva) and your own time.
Turnaround: Depends on your skill level.
Expect a learning curve if you’re new to image editing.
Quality: Difficult to achieve a natural result without experience.
Lighting mismatches and unnatural drape are common issues.
Scalability: Practical only for very small catalogs.
Doing this for thirty or fifty SKUs becomes unsustainable quickly.
For one or two items, DIY is a reasonable first step.
For anything at scale, the time cost becomes significant.
4. Overseas Retouching Services
Specialized retouching companies — many based in Southeast Asia and India —
offer batch processing at lower per-image prices.
What it costs: Lower per-image cost than domestic freelancers,
especially for volume.
Turnaround: Ranges from overnight to a few days depending on the service and batch size.
Quality: Generally consistent within a single service,
but you’re working with composite techniques,
so the “cut-and-paste” look can still appear on complex garments like sheer fabrics or knitwear.
Scalability: Good for large catalogs once you’ve established a working relationship and briefed the team on your style requirements.
The friction point is communication.
Writing clear briefs in English, explaining brand style preferences,
and managing revision rounds across time zones takes effort upfront.
5. AI Generation (Tools Like LaonGEN)
You upload a garment photo — flat lay, hanger shot, or mannequin —
and the AI generates an on-model image automatically.
What it costs: Subscription or credit-based pricing.
No additional fees for photographers, models, or studios.
Turnaround: Minutes. You upload, configure, and download the same day.
Quality: Consistent across a batch because the same model and output style are applied every time.
Fine details on complex textures (very fine embroidery,
sheer fabrics with intricate patterns) can be a limitation with current AI technology.
Scalability: Upload ten items or a hundred — the process is the same.
This method works well when you need to move quickly,
need consistent visual style across many SKUs,
or want to test how garments look on-model before committing to a full photoshoot.
If you want to see how different pose and background combinations look with the same garment, this guide on combination lookbooks walks through the options.
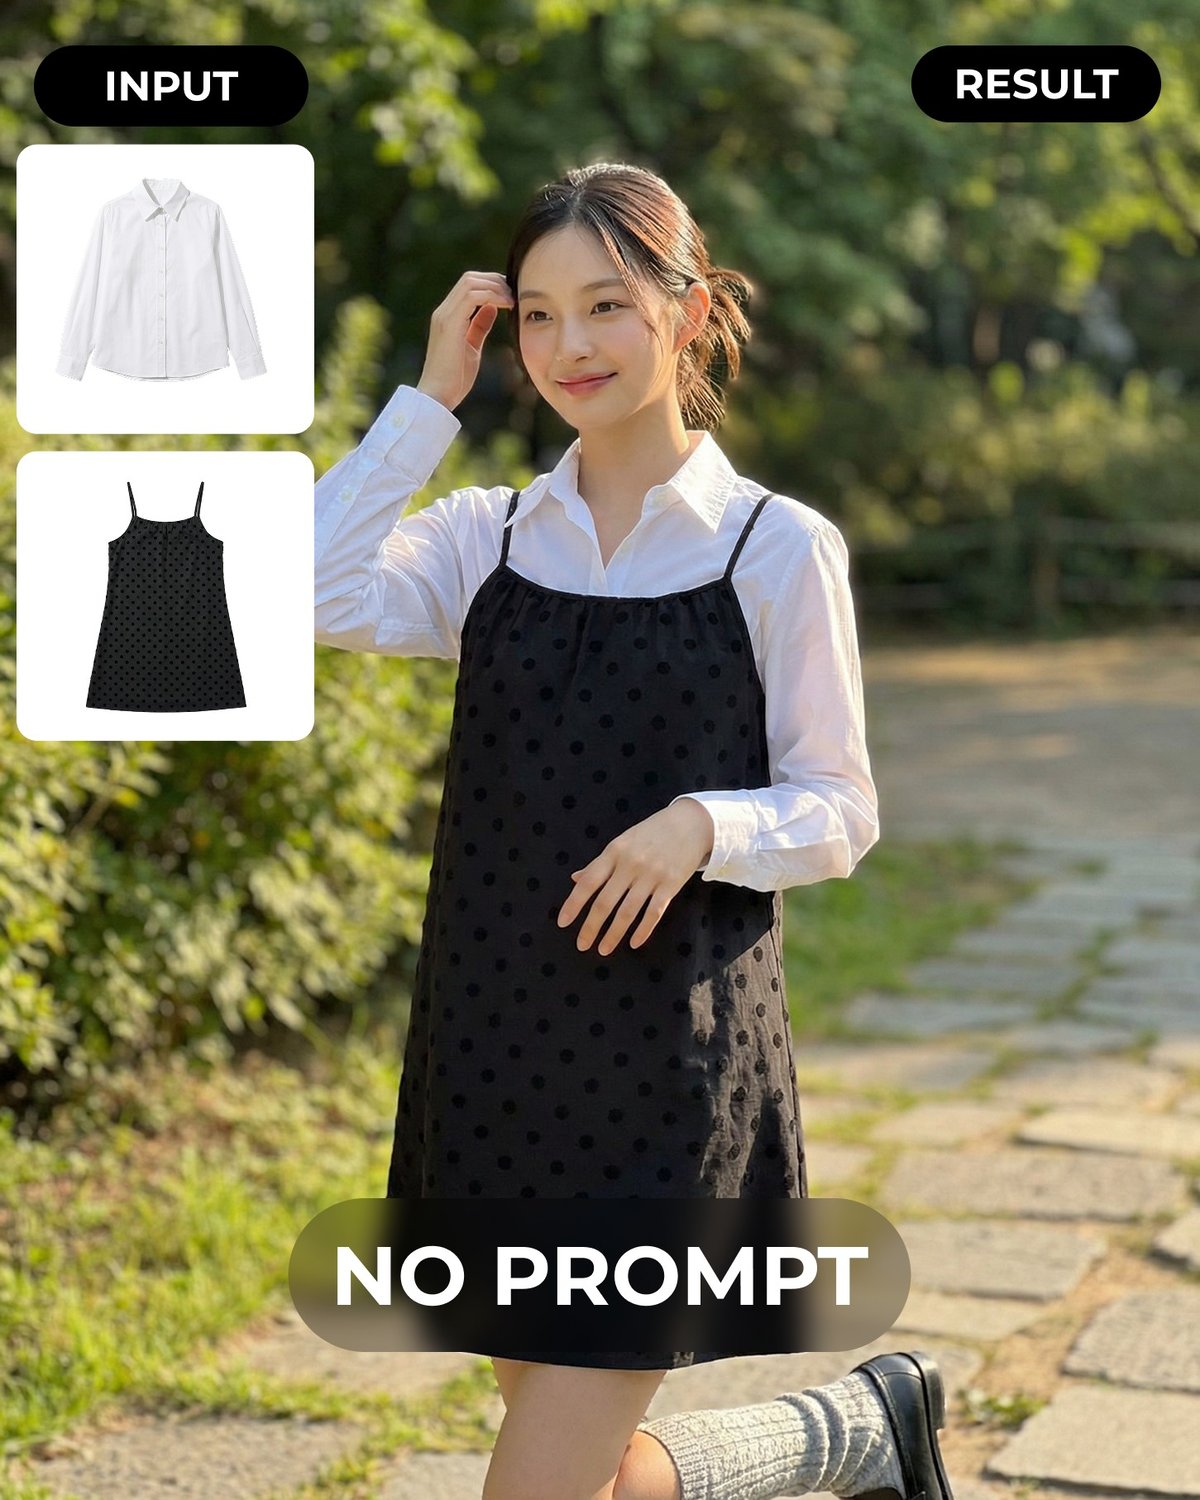
Here’s a short demo showing the process from product photo to on-model result:
Comparison at a Glance
| Method | Time to Results | Upfront Setup | Quality Ceiling | Best For |
|---|---|---|---|---|
| Studio photoshoot | 1–2 weeks | High | Highest | Hero / campaign images |
| Freelance composite | 3–7 days | Medium | Medium–High (variable) | Small batches, budget mid-range |
| DIY editing | Hours to days | Low | Low–Medium | 1–2 items, tight budget |
| Overseas retouching | 1–3 days | Medium | Medium | Large volume, price-sensitive |
| AI generation | Same day | Low | High (consistent) | Speed, scale, SKU coverage |
The same garment can look very different depending on scene and styling choices.
Below, a single hoodie appears in a studio setting and on a Paris street —
both generated from the same product photo.
Decision Checklist
Copy this and work through it when deciding which method to use for your next batch.
Your situation:
- I have fewer than 5 items to convert this week
- I have 6–20 items to convert this week
- I have more than 20 items to convert this week
Your constraints:
- I need results within 24 hours
- I have 3–7 days of lead time
- I have 2 weeks or more
- Budget is a primary concern
- Consistent visual style across all images is important
- I need images for a hero campaign (homepage, major ad)
- These are standard catalog listings, not campaign hero shots
Your starting material:
- I have a clean flat lay (garment laid flat on a white or neutral background)
- I have a hanger shot (garment hanging)
- I have a mannequin photo
- My product photos are clean with a clear, uncluttered background
- My product photos have busy backgrounds that need cleanup first
Reading your answers:
- Checked “hero campaign” + “2 weeks” + “quality is everything” → Studio photoshoot
- Checked “small batch” + “3–7 days” + “medium budget” → Freelance composite
- Checked “1–2 items” + “tight budget” + “can invest time” → DIY
- Checked “large volume” + “price-sensitive” + “not hero images” → Overseas retouching
- Checked “need results fast” OR “consistent style” OR “more than 5 items” → AI generation
If you have clean product photos and need coverage quickly across multiple SKUs,
AI generation is usually the lowest-friction starting point.
Try It Free: What to Check with One Lookbook
Before deciding whether AI generation fits your workflow, test it with one garment.
Here are three things to verify during that free run.
1. Does the garment’s fit and silhouette hold?
Check that the AI model’s body shows the garment’s actual shape — shoulder width,
length, and any structural elements like a structured collar or A-line cut.
If the silhouette reads correctly, the image will work for most listing contexts.
2. Does the background and scene feel natural?
Look at whether the generated scene suits your brand’s visual style.
A garment positioned against an indoor studio look or an outdoor setting should feel intentional, not awkward.
If it reads as a real photo environment,
buyers are less likely to notice it was generated.
3. Are the key details preserved?
Zoom in on elements that matter for your product — button placement,
stitching patterns, print alignment, or fabric texture.
These details are what buyers look at before purchasing.
If they’re clear in the output,
the image can do the job of an on-model shot for catalog listings.
If all three check out, the method is worth scaling.
If any one of them doesn’t hold up,
you’ve learned that before committing more time or budget.
For a walkthrough of how different scene and pose settings interact with the same garment, see this cafe pose variation guide.
If you’re new to LaonGEN and want to understand what the service covers end to end,
the service introduction is a good starting point.